Further development of Windows RT has been abandoned on the Surface RT/2 devices, which means that many devices are lingering away unused in drawers around the world, waiting for new life.
The hardware in the Surface RT/2 is still quite acceptable to be used as a tablet even many years after they were abandoned by Microsoft. For those interested in Windows RT on the Surface RT/2 a newer Windows 10 build can be installed. Instructions for updating a Surface RT/2 to Windows 10* or RT 8.0/8.1 can be found here -
https://windows-rt-devices.gitbook.io/windows/tools/windows-media-builder
*NOTE! No this will not install a full x86 build!
Discusses Microsoft's strict lock-down on running Win32 applications.
If you've used Windows RT for any length of time you have probably already realized that trying to run a traditional Windows executable is not possible under a stock configuration. If you do try and run one you will probably see a message like the following.
There are two reasons why this happens. The first reason is that Windows RT uses a completely different type of CPU architecture to the one used on standard Windows. Rather than using the x86/x64 from Intel or AMD, Windows RT instead uses the 32-bit ARMv7 architecture. So since almost every Windows executable on the internet is compiled for x86/x64 so do they all fail to work under Windows RT.
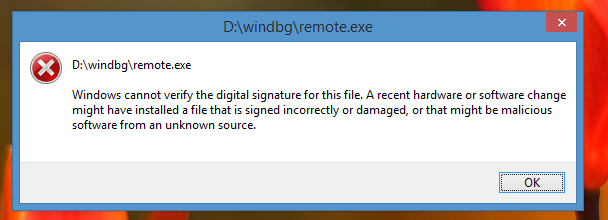
This may arguably have been trivial for software developers to solve were it not for the next major problem. If you do get your hands on an ARMv7 compiled executable and try to run it, you will see something like the next following message.
This is caused by another difference Windows RT has to standard Windows which is what is called the minimum signing level. This level is set in the kernel and cannot be changed as far as we know. It goes like this:
Allowing only for Microsoft code to run in the context of Win32 completely cut off any third party support for the system in this area. Third party developers were instead expected to write their software for the Windows Store.
Over the years there have been a couple of exploits for bypassing the aforementioned signing requirement. Since all are quite vaguely named, I shall refer to them only by their author. Here are all known exploits...
#
Level
Description
0
Unsigned
This is the value found on standard Windows machines. It allows any executable to be ran.
4
Authenticode
Would only allow for an executable to be ran if it were signed by a verified publisher. You could not run applications with a "Unknown Publisher".
8
Microsoft
This is what Windows RT is set to. Only code signed to run by Microsoft is able to be ran by a user.
12
Windows
Would lock any executable from running except those included with the Windows install.
Exploit
Date
Description
January 10 2013
The earliest known exploit. Works by using Windows Symbolic Debugger (cdb.exe) to change the minimum signing level loaded in RAM. Requires two minute system up time to work properly and may sometimes cause a BSOD.
October 14 2015
bcdedit /set '{current}' loadoptions '/TŅSTSIGNING' enables test signing mode. Works around /testsigning option being blocked because blocked options are checked for before they are passed to ntoskernel.exe. Once passed ntoskernel.exe truncates unicode down to 8-bits and Ņ becomes E.
Windows Recovery Environment (WinRE) and Windows RT Installation Files
Insider Preview (Mirror)
To be investigated, needs recovery images and test devices
To be investigated, needs recovery images and test devices
Here is a link to a website which holds recovery images for other devices that run Windows RT. If this link doesn't work anymore please contact us on the discord server.
Recovery ToolKit is a collection of scripts and files that make modifying the internal disk a breeze
To let the toolkit make adjustments to the storage of the RT device we have to boot onto a Windows 8.0 recovery environment. If you plan to do these you should first turn off any bit-locker encryption on the RT device.
Prepared recovery images that include the scripts and files are provided below. The base image is 500MiB but has to be supplied with an install file to apply. These are separated to the recovery image. Different regions are there to give the correct language, keyboard and culture options. Different regions should work on the hardware.
Booting into the recovery mode is done by following these steps
Switch off your device
Press and hold the volume down button
Press the power button
Release the volume down button after the surface logo appears
Wait about 2-3 minutes for the recovery environment to load (depending on usb stick speed)
Once loaded up in recovery you are asked to select a language and keyboard layout, do so. Proceed to then select the Troubleshoot and Advanced Options to get a CMD window. Execute the following command in the terminal window.
You will be greeted with a verification question that bit-locker is turned off. Once confirmed you are presented with the main menu.
You can navigate the menu's by entering the number of the corresponding menu item. 0 will always bring you up in the menu tree.
In automated installs you can wipe, automatically partition and install a .wim file that was put in the sources folder of the recovery. For Windows 8.0 this file is named Install.wim, these should also come with a CreatePartitions-UEFI.txt file to partition the disk with. Windows 10 only requires a file named Install_10_15035.wim and uses the /sources diskpart script.
Partitioning automates the wiping and partitioning of your device. It can format using the CreatePartitions-UEFI.txt in the sources folder or use the 2 default scripts provided in the Scripts folder. 4K is there because it was provided in the original source. Normally no 4K disks are used in known devices.
Installs executes dism with an .wim image out of the sources folder on the recovery disk. Respectively called Install.wim and Install_10_15035.wim.
Under boot you can copy over the boot EFI files to be able to boot Windows RT, add installed windows version to the boot manager and copy a broken copy of grub over to the efi partition and put it as boot manager instead. Using the copy efi options will copy a version of the windows boot manager to the S partition. This is necessary to boot any windows version. Windows 8.0 is happy with the recovery efi. Windows 10 requires a espefi for reasons. The grub is version 2.02 and is the only non windows environment the surface has booted in. The grub install comes with a config that has quite a flew automatic boot discovery options and basic actions. The grub config is unable currently to boot windows itself, so it makes it useless in that sense. Only do this if you intend to use or modify the configuration.
Under unlock you can apply bcdedit commands for testsigning and the secureboot soft disable to allow our self signed binaries.
