Loading...
Loading...
Loading...
Loading...
Loading...
Loading...
Loading...
Loading...
Loading...
Loading...
Loading...
Loading...
Loading...
Loading...
Loading...
Loading...
Loading...
Loading...
Loading...
Loading...
Loading...
Loading...
Loading...
Loading...
Loading...
Loading...
Loading...
Loading...
Linux for Surface RT
Each way of booting has it's own advantages and disadvantages. EFI is easy to boot but has bad performance and power effiency. APX needs more special hardware to boot but performs much better.
EFI booting is the easier way of booting Linux.
No L2 Cache, no cpuidle (bad performance)
No power related features (no PMIC regulators)
USB drive
APX booting needs some special hardware.
No Wi-Fi
Dynamic Voltage Frequency Scaling (best performance)
USB A-to-A cable (straight: D+ -> D+, D- -> D-)
µSD Card
Linux PC (x86)
Screen (Touch, LVDS Encoder, Backlight)
SD Card (+UHS-I mode)
USB-A host
2 GB DDR3 RAM
HDMI (with audio)
Vol+/-, PWR, Windows Buttons
Touch-/Type-/Powercover (+ hotplug detection)
Hall effect lid sensor (close tCover to suspend the device)
NCT1008 CPU and case temperature sensor
Audio: only output (headphone & speakers)
Hardware Acceleration (3D)
Bluetooth
Camera
APX and EFI Devicetree for Surface RT.
Please be careful with random device trees. They could contain wrong power management settings which could destroy your board.
Why do we need 2 different devicetrees for the same device?
APX can use the full potential of the device. Therefore APX can boot with the full devicetree which enables all currently supported features.
UEFI Firmware on the other hand blocks access to some power related features like PMIC regulators, L2 Cache and Dynamic Voltage Frequency Scaling. Therefore UEFI devicetree only removes features from the APX devicetree and only adds features which are currently UEFI exclusive. Furthermore the UEFI devicetree provides fixed regulators which in place of the PMIC regulators which are needed by other features. (e.g. µSD voltage switching from 3V3 to 1V8)
APX can boot normal and UEFI kernels. UEFI can only boot UEFI kernels. Therefore we use UEFI kernel for both methods of booting. This simplyfies development, testing and distributing kernel Images for both boot methods.
Visit the main Linux page for a short comparison between EFI vs. APX Linux
Building a Kernel is an advanced process for most beginners. If you just want to use Linux on your Surface RT you should go with the prebuilt binaries. If you want to help developing you need to compile the kernel on your own.
If you don't want to compile a kernel yourself, just use the prebuilt binaries. They are built everytime new hardware support is added. These images additionally include a lot of USB drivers and are digitally signed.
Get information on how to compile a working Linux kernel. You can either use mainline linux, or grate-driver/linux (based on Linux-next with experimental changes for tegra devices).
There are branches for all devices.
Use the master tree to only get tested and stable features for all devices:
https://github.com/Open-Surface-RT/grate-linux/
Use the device speccific branches for your device:
https://github.com/Open-Surface-RT/grate-linux/tree/surface-rt
https://github.com/Open-Surface-RT/grate-linux/tree/surface-2
https://github.com/Open-Surface-RT/grate-linux/tree/lenovo-ideapad-yoga-11
For information on how to boot your kernel, visit the Booting page.
Since the beginning of July 2021 our changes to the Linux kernel are upstreamed to grate-driver/linux. For pull requests we created our own fork:
This fork contains the latest changes. Eventually they will be merged to grate at some point.
This means you can either use grate-driver/linux, without the need of modifying the kernel source, or you can use mainline Linux, with the need of applying patches.
You should be able to use the latest versions without problems.
You can get it on Github:
git clone https://github.com/torvalds/linux.git --depth=1
or use .tar files from kernel.org
https://www.kernel.org/
grate-driver/linux has these patches already included.
Go to ./arch/arm/boot/dts, create a file with the name tegra30-microsoft-surface-rt-efi.dts and paste the contents of the code block in the devicetree sub-section.
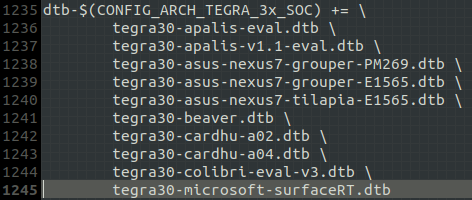
Search for dtb-$(CONFIG_ARCH_TEGRA_3x_SOC) += in the Makefile (same directory), there you can see a few lines which begin with tegra30, add a line with the devicetree file name you created above, but instead of the extension .dts use .dtb. Be aware that you will need to add a backslash (\) at the end of the previous line. Here is a picture how it should look like:
Open up a terminal and cd into your linux-5.12.3 directory. Then download the patch from bellow and run git apply 0001-Add-ACPI-Parking-Protocol-for-arm32-devices.patch
This should add ACPI Parking Protocol to your kernel and allows you to use SMP.
The patch doesn't follow kernel coding conventions. This will eventually be fixed.
This patch was created from commit c0a5652f from grate-driver/linux. The changes in the devicetree were removed. (Created with git format-patch -1 c0a5652f) Rungit apply 0001-WIP-ARM-tegra-Add-Type-Touch-Power-Cover-support-for.patch to apply the patch.
This patch was created from commit e2a2772b from grate-driver/linux. (Create with git format-patch -1 e2a2772b) Run git apply 0001-i2c-GPIO-based-hotplug-gate.patch to apply the patch.
Configure and build Linux kernel for Surface RT
First run the command make ARCH=arm tegra_defconfig
This will create a standard kernel config for tegra SoC's.
Open the file .config in the kernel source directory with your favorite text editor and paste the following at the end of the file
CONFIG_EFI_STUB=y
CONFIG_EFI=y
CONFIG_I2C_HID_OF=y
CONFIG_I2C_HOTPLUG_GPIO=y
CONFIG_BATTERY_CHARGER_SURFACE_RT=y
CONFIG_MWIFIEX=m
CONFIG_MWIFIEX_SDIO=m
CONFIG_SND_SOC_TEGRA_WM8962=y
CONFIG_HID_MICROSOFT=y
Note that some drivers (Wi-Fi) are built as modules. See exporting modules below to use them.
To build the kernel use the command make ARCH=arm CROSS_COMPILE=arm-linux-gnueabihf- -j $(nproc)
- $(nproc) sets the number of threads to your CPU core count
This command can take a while depending on your computer's speed. (5+ minutes)
Note: If you get asked what configuration you want to choose, just press enter, this will take the standard value.
If compiling was successful you should see some output similar to this:
(This doesn't need to be a the end of the log. Scroll up a bit ;) )
CALL    scripts/checksyscalls.sh
CALL    scripts/atomic/check-atomics.sh
CHK     include/generated/compile.h
Kernel: arch/arm/boot/Image is ready
Kernel: arch/arm/boot/zImage is ready
The output kernel image is located at arch/arm/boot/zImage
The output device tree is located at
EFI:arch/arm/boot/dts/tegra30-microsoft-surface-rt-efi.dtb.
APX:arch/arm/boot/dts/tegra30-microsoft-surface-rt.dtb.
You can create a .sh script in kernel root to speed up your workflow
Some drivers will be built as modules. This reduces the kernel image size.
The module folder needs to be placed on the rootfilesystem in /lib/modules.
Some drivers need to be built as module. For example the Wi-Fi driver. Wi-Fi needs a firmware which will be send to the Wi-Fi SoC at the time the hardware is probed. This can happen before the root filesystem is mounted. Therefore the driver can't load the firmware. If wifi is built as module it won't be loaded before the root filesystem was mounted.
This command will place the modules folder next to your Linux kernel folder.
You need to copy the modules after: - Modifying the kernel source for the first time - Every git commit - Editing a driver which is built as module (obvious?)
Commonly used kernel parameters
microsoft-surface-rt.dtb for APX booting
microsoft-surface-rt-efi.dtb for EFI booting
Specifies the root filesystem which should be used.
/dev/mmcblk0pN eMMC partition N
/dev/mmcblk1pN µSD Card partition N
/dev/sdaN USB partition N
tty0 for normal console (internal screen+tCover/USB keyboard)
ttyS0,115200n8 for serial console at 115200 Baud, no parity bit, 8bits (need uart access)
You can specify multiple console= options on the kernel command line. Output will appear on all of them. The last device will be used when you open /dev/console. So, for example:
defines that opening /dev/console will get you the current foreground virtual console, and kernel messages will appear on both the VGA console and the 2nd serial port (ttyS1 or COM2) at 9600 baud.
Waits for root filesystem. Some root filesystems will be mounted after the kernel finished initalizing hardware. Thats the case for USB. eMMC/SD seems to work without this parameter.
EFI doesn't support CPU idle therefore it must be disabled for efi booting. You shouldn't use this param for APX booting.
Boot Linux on Surface RT
UEFI boot gives you instructions on how to boot Linux using the UEFI firmware.
APX boot gives you instructions on how to boot Linux using the fusee gelee exploit. It's more complicated than UEFI boot as you need a second computer with the correct files.
Sometimes you need to edit the preconfigured kernel command line. Kernel parameters will give you a brief overview and tell you possible configuration options.
Note that you can only define one console per device type (serial, video). -
Boot an EFI-based Linux kernel on your Surface RT.
A Surface RT with secure boot disabled. Visit Yahallo for more information on how to disable it.
A USB drive, formatted as FAT32 with either MBR or GPT. The partition doesn't require being marked as EFI system partition. Be aware that FAT32 isn't FAT32.
A root filesystem/distro on your SD card (recommended)/internal storage/USB. See root filesystem.
There is a premade ZIP below.
There are prebuilt binaries.
Most people use UEFI shell to chainload an EFI linux kernel. Using UEFI shell gives the option to easily specify and modify the kernel command line.
You may want to use different bootloaders, like GRUB.
Place UEFI shell onto your bootable USB drive (as efi/boot/bootarm.efi) and place the zImage and the tegra30-microsoft-surface-rt-efi.dtb files onto the root of your usb drive.
You will need to create a startup script for UEFI shell:
You may want to change the line that begins with zImage. It is the kernel command line. root=/dev/mmcblk1p2 is the second partition of the sdcard, change this if you want to use a different device/partition. RPI OS is a recommended distro, as it runs smooth
root=/dev/mmcblk0p2 is a location set to internal storage (eMMC) second partition, set it to this after cloning the installation over to internal storage.
root=/dev/sda2 is a second partition for USB only boot, set it to this if you want to USB boot only
See Kernel parameters for further information.
Extract this ZIP to your USB, and add your zImage and device tree to it. You can find precompiled binaries here.
With the USB drive set up, a distro installed and secure boot disabled, you are ready to boot linux.
Shut the device off
Plug in your USB drive
Boot from the USB
Hold the volume down button
Press the power button for a second
Wait until the surface logo appears
Release volume down
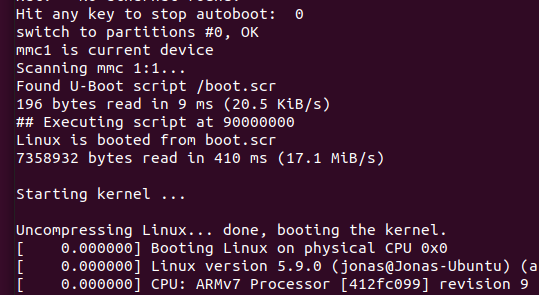
You should see kernel logs onscreen (after a short while (15 seconds), wait for 1 minute if nothing happens try again)
If you have any issues, feel free to contact us on discord.
With the method shown above, you will need your USB always on hand to boot linux. You can also install these boot files on the internal storage.
The easiest method is to just clean the windows boot files from the EFI partition, and replace them with the contents of your USB drive.
This will make you unable to boot Windows!
It is possible to make Windows and Linux dual-boot. For example, you can use GRUB.
Replace the contents of your startup.nsh on the USB with the following:
After booting, it will copy the devicetree, zImage and the startup-system.nsh over to the EFI partition on the internal storage. Fill your startup-system.nsh with the linux boot commands. (The commands you normally have in your startup.nsh)
This method is also useful for updating the device tree and zImage, if you already have existing linux files there.
Prebuilt binaries for APX/EFI linux
All zImage files that have (signed) at the end, are digitally signed by @Leander. Here is the certificate file:
All files built include a lot of USB device drivers, so features like USB RNDIS will work.
root=/dev/mmcblk0p2 is a location set to internal storage (eMMC) second partition, set it to this after cloning the installation over to internal storage.
root=/dev/sda2 is a second partition for USB only boot, set it to this if you want to USB boot only
mmc stands for the storage type, more specifically a MMC memory module like eMMC storage or a SD card.
mmcblk[]0[] would be used to specify the exact partition in a boot configuration file, for example root filesystem partition, in this case it can be mmcblk[]p2 for typical Linux distros.
0p[] is used for internal storage definition as it's the primary MMC module
1p[] is used for external MMC storage like a SD card
Typical Linux distro consists of two partitions; small FAT32 formatted boot partition with kernel stuff and a main root partition which contains the entire filesystem. Root file system is formatted as EXT4 in most cases!
In this case mmcblk[]p1 is a FAT32 boot partition and mmcblk[]p2 is a root file system.
sda[] is used to define a USB drive's partition as it's considered an external media.
In our case sda1 would be FAT32 boot partition and sda2 a root file system.
Modules are required for features like WiFi. Make sure to extract them to the root of your root filesystem. The lib folders of the ZIP and of the root filesystem should merge. The modules are not required for booting, you can extract them while the system is running on your Surface RT. (E.g. When you are not able to extract the modules to a EXT4 filesystem on your main PC)
The latest binaries and modules of kernel, devicetree, modules can be found below.
Write to USB disk with e.g. rufus/etcher and boot.
No support for older builds. Use at your own risk.
For booting take the zip bellow, extract to USB and place your desired zImage and devicetree file onto the USB (don't rename). For more information visit the .
You may want to change the line that begins with zImage! Kernel files are distributed in a long name for archival sake so double check if you renamed it to just zImage. root=/dev/mmcblk1p2 is the second partition of the SD card, change this if you want to use a different device/partition. is a recommended distro, as it runs smooth
Boot linux on your Surface RT using the Fusée Gelée exploit.
APX booting is for advanced users. Visit the main Linux page for a short comparison between EFI vs. APX Linux
You should read all the the sub-sections before you start. The subsections are logical ordered from top to bottom
Get the latest and tested Devicetree for APX boot.
As we bypass all the firmware with APX boot, someone needs to setup memory and load Linux. Uboot is used for this.
Get prebuilt binaires for Das U-Boot if you don't want to compile it yourself.
Get a Linux kernel for APX.
Linux without any root filesystem is useless for the end-user. Get instructions on how to get one.
Fusée Gelée is the exploit used to bypass the security checks for APX mode. Get information on how to execute the exploit in order to boot linux.
Booting linux with APX mode is rather complicated. You can find a little summary and final instructions here:
Boot Linux on Surface RT. Setup is a bit tedious but once the setup is complete it is very easy to use.
Read all pages of the Linux topic carefully before you try to boot Linux
Insert SD Card into the SurfaceRT
Linux should be booted and be accessible via UART and/or show HDMI/Screen Console
Enjoy and fix issues.
Linux should be booted and be accessible via UART and/or show HDMI Console
Enjoy and fix issues.
U-Boot for Surface RT.
You can use U-boot for tegra
git clone https://github.com/OE4T/u-boot-tegra; cd u-boot-tegra
or U-boot Mainline
git clone https://gitlab.denx.de/u-boot/u-boot.git; cd u-boot
THIS IS VERY IMPORTANT!!! If you skip this step you can damage your device Use the devicetree below. Don't use the devicetree from Linux.
Replace the content of ./arch/arm/dts/tegra30-cardhu.dts with following code:
Now you can build U-Boot:
make cardhu_defconfig
make ARCH=arm CROSS_COMPILE=arm-linux-gnueabihf-
Now you should find the file./u-boot-dtb-tegra.bin
This your Uboot Image which contains the SPL and Uboot.
Booting Linux from UART is tedious and you may don't have UART access. To automate the boot process a boot script can be used. Create a file:
Compile it using:
mkimage -A arm -O linux -a 0 -e 0 -T script -C none -n "SurfaceRT Boot Script" -d boot.script boot.scr
Place boot.scr on the SD Card next to the kernel.
Tip: Don't hit any key to stop autoboot
To boot Linux on Surface RT we use the Fusée Gelée cold boot exploit. See for further information.
from your device
with correct devicetree
Create a
with correct devicetree
for ARM32
Create/Get
Place , devicetree and on first partition
extract on second partition
Go to to your directory
place your U-Boot '' in ./u-boot
Send UBoot to Surface RT use or
If you have you should see U-Boot boot process
Send UBoot to Surface RT using or
If you have you should see U-Boot boot process
Send and launch fusee exploit binary over usb, using python script.
Send and launch custom bootloader binary over usb, using modified NvFlash to bypass security checks.
(Experimental) Loading a bootloader binary and executing at specific memory address by adding --setentry 0x80808000 0x80808000 before --bl. 0x80808000 for example, is the memory address for the factory UEFI SPI-Flash bootloader. The factory bootloader binary is obtained by using the decryption script with the relevant SBK and dump of the SPI-Flash memory.
Send a payload which patches a security fuse temporarily (until next power off). Uses original nvflash to read the BCT from Device.
BootConfigTable for the Surface This defines SDRAM configuration, as well as bootloader location. Described here (with compiler / decompiler) https://github.com/NVIDIA/cbootimage-configs
see
cloned and build 29 / Jan / 2021 12:00 instructions
build from
The Root Filesystem contains all the necessary binaries your system needs to boot
After building a kernel you need a userspace which contains all the binaries you want in your system. Like echo, cat, ls, candy crush (o.O looking at you MS)
There are two ways to get these binaries Option 1: Build your own root filesystem with Buildroot or similar tools Option 2: Get a premade root filesystem (distro)
pro
contra
Very small (few MB)
You need to install all packages by yourself
Boots very fast
For advanced users
pro
contra
Many packages preinstalled
Large (up to few GB)
Community support
Bloated
Easy for beginners (except Arch)
aka. Distro
There are still a few distros out there which support ARM32
Archlinux
Fedora
Lubuntu 16.04
... (append it pls)
Downloads for older and probably dated builds can be found here: https://berryboot.alexgoldcheidt.com/images/
To make use of hardware acceleration we need to use grate-driver Following distros support grate-driver out of box:
Archlinux
PostmarketOS
Linux comes in all different flavors just like ice cream, you can choose whatever fits you. For ease anything Debian based is recommended, advanced users can look for Arch or Fedora. Difference is how commands work but deep down everything is nearly same.
There are two ways of booting Linux, APX payload or EFI boot, this time let's focus on EFI.
Prepare SD card with any Distro of your choice You can use Balena etcher, Rufus, Raspberry imager etc. Doesn't matter which one
Prepare a FAT32 formatted USB drive with EFI and kernel files, they are linked below, extract to root directory
Put the SD card in your Surface
Turn off tablet, complete shutdown and not sleep mode
Plug in the USB drive you prepared
Turn on by holding volume down key, release it when the logo appears
Let it boot. If it does it will go past the kernel log and load a distro of your choice. It should be safe to unplug the USB once Distro has loaded up. (The distro could have mounted the USB, so be careful with that)
Make sure that you have Yahallo applied. See here
Make you that you copied the modules forlder to /lib/modules
Make sure that the kernel version and the modules version do match
Get the modules folder name and compare it to uname -r
postmarketOS for Surface RT
https://wiki.postmarketos.org/wiki/Microsoft_Surface_RT_(microsoft-surface-rt)
Currently there are no prebuilt images available. Please build your own image using pmbootstrap.
RootFileSystem for Surface RT
Download Buildroot from https://buildroot.org/download.html
unpack it
open directory in terminal
type: make menuconfig
-> Target options
-> configure for ARM. (see picture)
There are maybe better choices but it works at the moment.
Type: make
wait for 15-20 minutes. A lot of stuff is downloaded and compiled.
When finished you will find ./output/images/rootfs.tar
target packages: libraries -> hardware handling -> libgpiod[*] -> install tools[*]
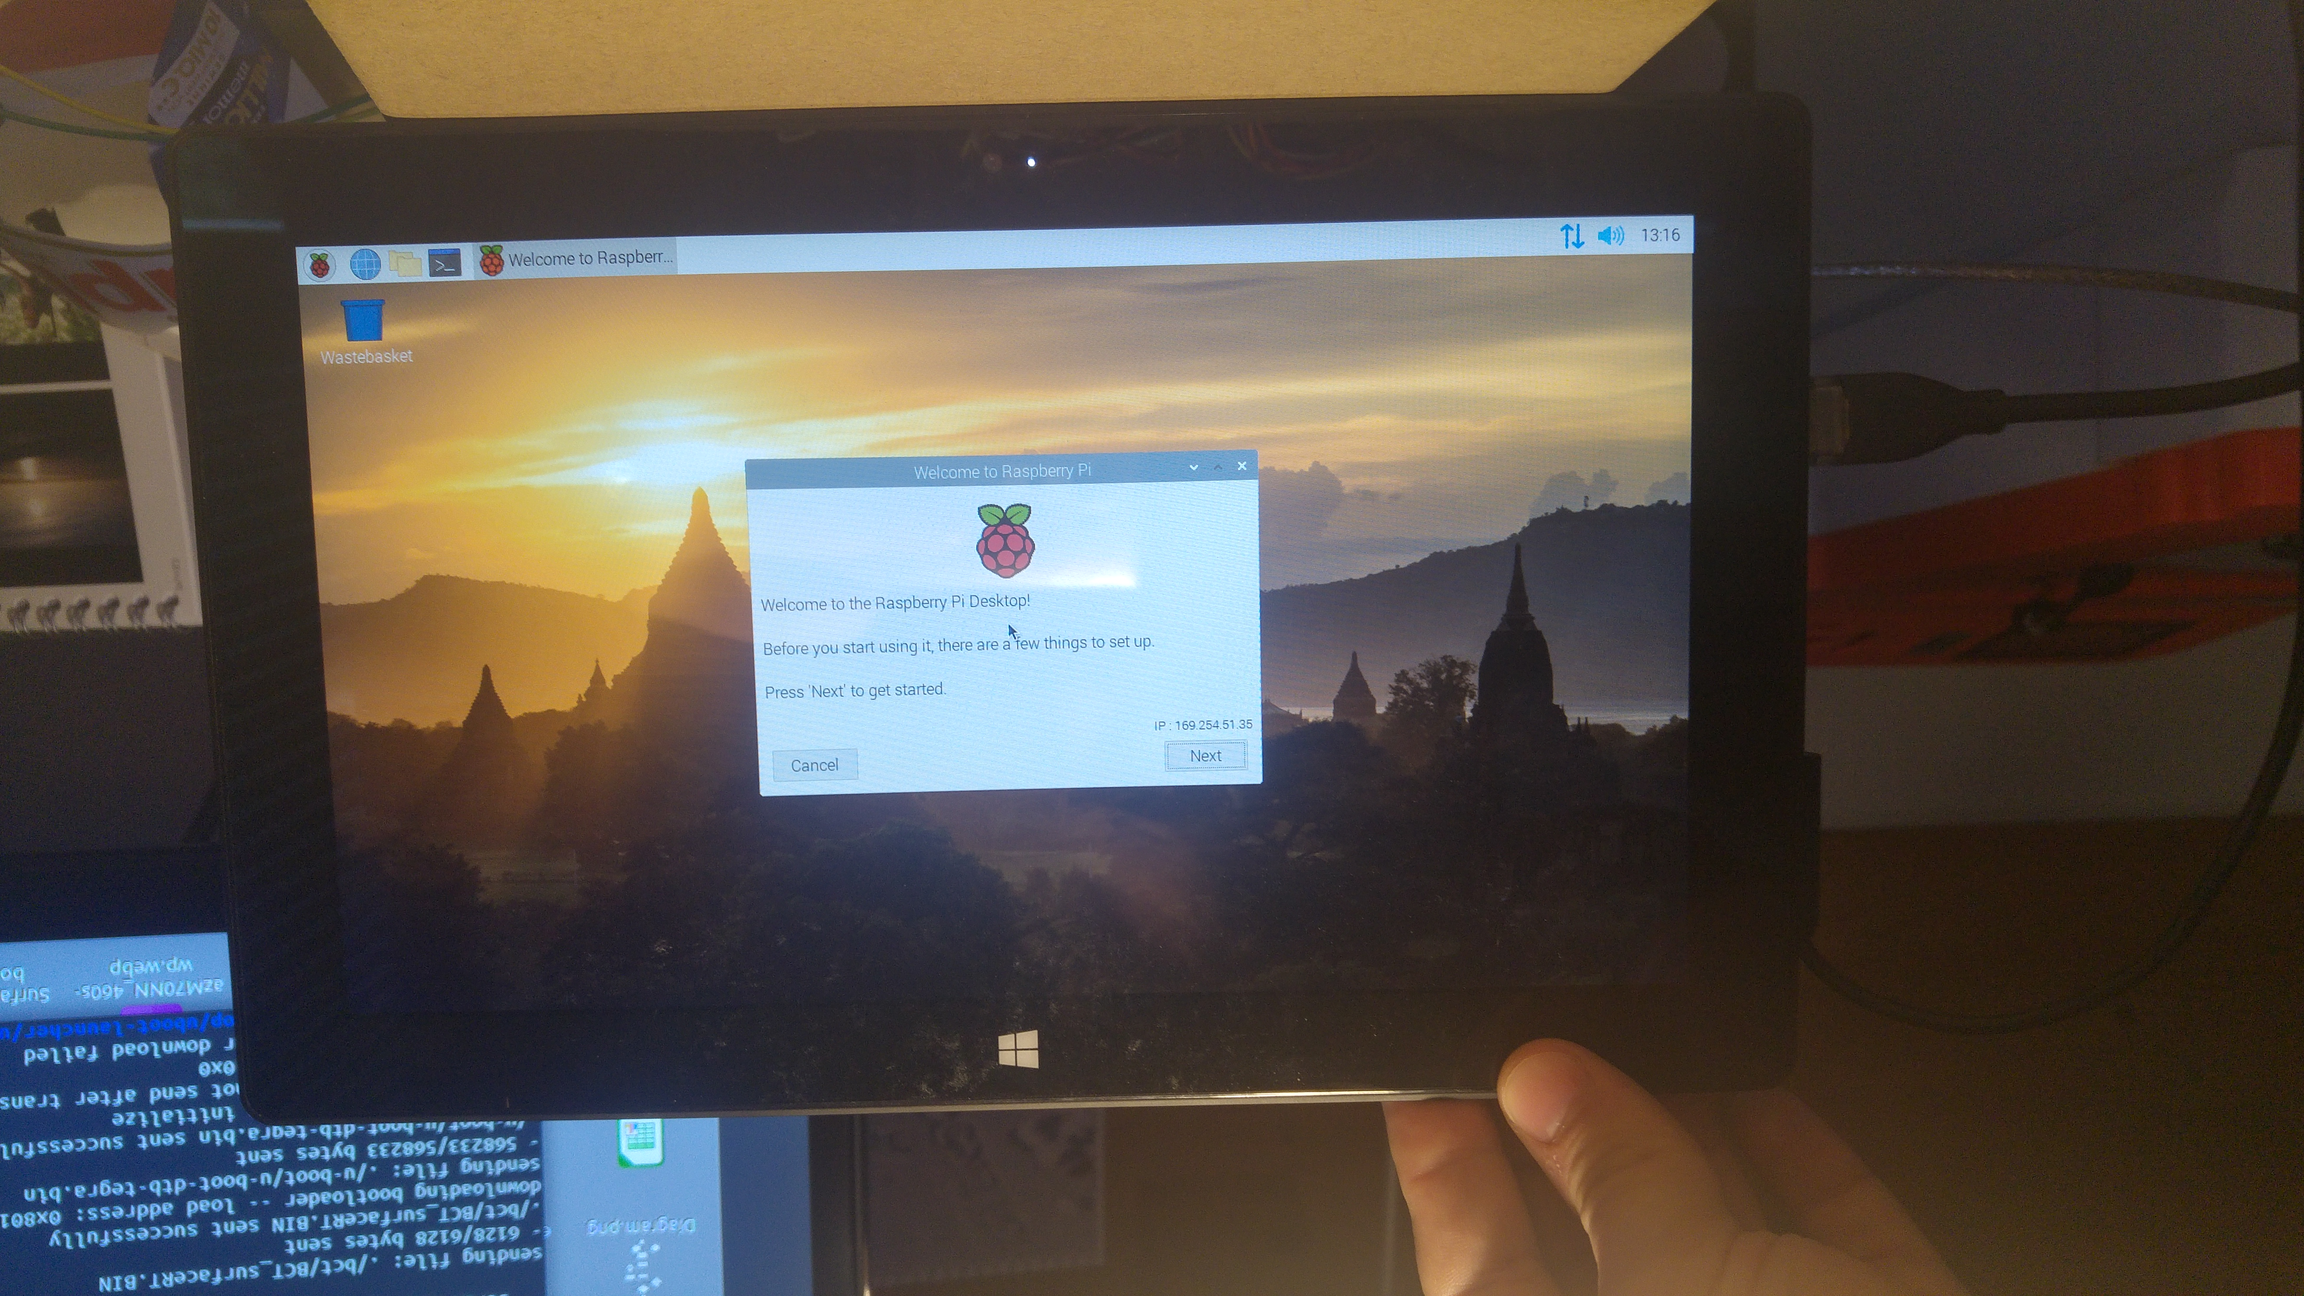
Install Raspberry Pi OS on your Surface RT
Make sure that Secure boot is disabled before you try to boot Linux.
Use this guide
Installing Raspberry Pi OS is very easy in comparison to some other distros.
It can be done on a Windows or Linux host and therefore is easily accessible for everyone.
Grab all the "standard files" from - (usb-linux-boot.zip, zImage, tegra30-microsoft-surface-rt-efi.dtb).
Use Raspberry Pi OS Imager (sudo apt install rpi-imager) to image a USB drive as you normally would.
Place the efi folder, startup.nsh, zImage, and tegra30-microsoft-surface-rt-efi.dtb files onto the "boot"/fat32 partition of the USB drive. Confirming any overwrites.
Edit the startup.nsh file on the USB drive to show as below. For further information about kernel params can be found here
Download the modules and firmware - kernel modules - and place them in the root directory /. This is important. Without modules some features like Wifand i or CPU Temperature Sensor won't work.
If you are using Linux you can do this before booting RaspiOS for the first time on your host machine.
If you are using Windows you need to boot RaspiOS on Surface RT and copy the modules on from e.g another Fat32 USB to the root filesystem. You need to reboot once to load the modules correctly.
Insert the USB Drive into the Surface RT and Boot to the USB.
You need to install RaspiOS on USB first
It is only recommended to install it on eMMC if you really want to use it on eMMC. Otherwise you will wear out your eMMC unnecessarily.
Taken from Discord user Misterobots:
Once Raspberry Pi OS has booted from USB.
Go to Start menu -> Accessories -> SD Card Copier.
Select the USB drive as the "From".
Select the eMMC (mine was MBG4GA) as the "To".
Check the box that says "New Partition UUIDs". Click Start
Edit the startup.nsh (on the eMMC boot partition, that was just copied to) and change the root=/dev/sda2 to root=/dev/mmcblk0p2. Then save.
Once the Copy has finished (with no errors), shutdown the Surface RT, remove the USB drive, then power on the Surface RT normally. (do not hold Vol. down)
This should get you booted from eMMC with both boot and rootfs on the eMMC.
If you want to install Raspi OS on eMMC do the steps below after booting from eMMC.
There is only one thing to do after you can see the desktop.
Open the Terminal and enter sudo raspi-config
Choose Advanced Options
Choose Expand Filesystem
Now your SD Card / eMMC is writable and can use all of its space.
The default plugin always shows 0% charge left. Use the "Battery Monitor" plugin instead. It should be already installed
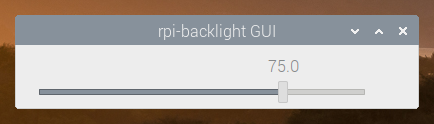
Unlike KDE, GNOME, MATE or XFCE, Raspberry Pi OS running LXDE does not seem to have any plugin to control the brightness. However, it is supported in the kernel level.
Download the rpi-backlight tool using `pip`.
Create the following udev rule so that this tool can be run without `sudo`.
Reboot.
Now you can run the software with rpi-backlight-gui. You can also create a desktop shortcut. Create the file `~/.local/share/applications/rpi-backlight.desktop` with the following contents.
See https://rpi-backlight.readthedocs.io/en/latest/usage.html#adding-a-shortcut-to-the-lxde-panel for more details.
At the moment both UHS-I SD cards and non UHS Cards are supported. UHS Cards operate at higher speeds and use 1.8V instead of 3.3V. (1.8V now works, we found LDO5 in the PMIC which handles SD signaling voltage)
The left SanDisk Card is UHS-I (SDXC-I) and has SpeedClass 3 (3 in U) and VideoClass30 (V30) See https://www.sdcard.org/developers/overview/bus_speed/index.html The right (Intenso) Card is an old Class10 (10 in C) SD card which works.
Use GParted or similar tool to create 2 partitions on your SD Card. First partition FAT16/32 - 255MiB Second partition EXT4